Daily Makeup Guide
By Brooke Ryan, agentically authored with AI · last updated May 31, 2026
I’ve been asked enough times about my everyday makeup that I figured I’d put it all in one place. This page is for adults — fellow beginners, honestly, including me — who want to experiment with a more complex routine, including some color correction. Color correction can do a lot of the heavy lifting before you ever pick up foundation, especially if you’re working with redness, dark patches, or other tonal variation.
Most of what follows came together from a Sephora makeup consultation, online tutorials, and a lot of mirror practice — with the showier techniques picked up from my figure skating team when I was learning competition looks. (More on that in How I learned below.)
A note on the products mentioned below: nothing here is sponsored, no affiliate links, no brand relationships — I’m just a happy customer sharing what works for me.
- Skill
- Beginner-friendly, with color correction
- Time
- ~5 min once practiced; 30 min–1 hr while learning
- Cost
- Starter kit ~$60–$100 (samples); full kit ~$400–$500
A starting point, not a recipe
Everything below is what works for me. Folks who don’t wear glasses, who have a different head or face shape, who are correcting different things, will reasonably end up with a different routine. Makeup is incredibly personal, and there isn’t one right way to do it — the steps here are a scaffold to start from, not a script to follow.
Beginning can feel frustrating, especially if you’re managing something bigger like heavy color correction. But it’s also an exciting time to experiment. I believe people are more compassionate than we give them credit for — when they see someone working through something visible about how they appear, my experience is they’re more empathetic, not less. Wearing makeup at the beginning can be vulnerable, and I think that’s beautiful.
On mistakes: some of my best looks started as them — a brush slip, a heavier hand than I meant, color landing somewhere I wasn’t planning to. When I accidentally land on something I like, I take note and try to reproduce it deliberately the next time, without the mistake. If you stray from the routine below and like what you see, that’s a discovery worth keeping, not an error to fix.
If your skin is healing, sensitive, or recovering from a procedure — rosacea, eczema, post-peel, post-procedure, anything that’s actively irritated — the routine still works, but a few extra precautions matter: check with your care team before introducing anything new, patch-test each product on your forearm for 24–48 hours first, and lean toward fragrance-free formulas and mineral (rather than chemical) sunscreen (see step 1 for how mineral sunscreen changes the rest of the routine).
The morning, at a glance
- Skincare base: lotion → ChapStick → sunscreen
- Color correctors: green for redness, orange for darkness
- Foundation primer (optional)
- Foundation
- Bronzer: jaw, temples, nose
- Blush: cheeks only
- Eyeshadow (and eyeliner, when going out)
- Setting spray
- Mascara (if going out — after setting spray)
- False lashes (occasional)
- Lip cleanup + ChapStick reapply
The stats card above gives the time range; the longer end — 30 minutes to an hour — is the realistic budget for the first few times you follow along, not a sign you’re slow. Getting fast comes with muscle memory and falls off quickly with practice. (For reference, this morning’s walkthrough — including stopping to photograph and film each step — took me seven minutes; in normal practice it’s closer to five.)
Each step has short muted videos in the sidebar that auto-play when scrolled into view — if you’re on cellular data and tight on it, switch to Wi-Fi or disable autoplay in your browser before scrolling through.
Beyond the morning, this page also covers:
- Vocabulary — if you’re new to makeup terminology
- Night cleanse — the evening half of the routine
- Techniques I’m considering — what isn’t in the routine yet but might be
- How I learned — the routine’s origin story
- If you’re just starting out — minimum kit and cost notes
- Products — the full kit
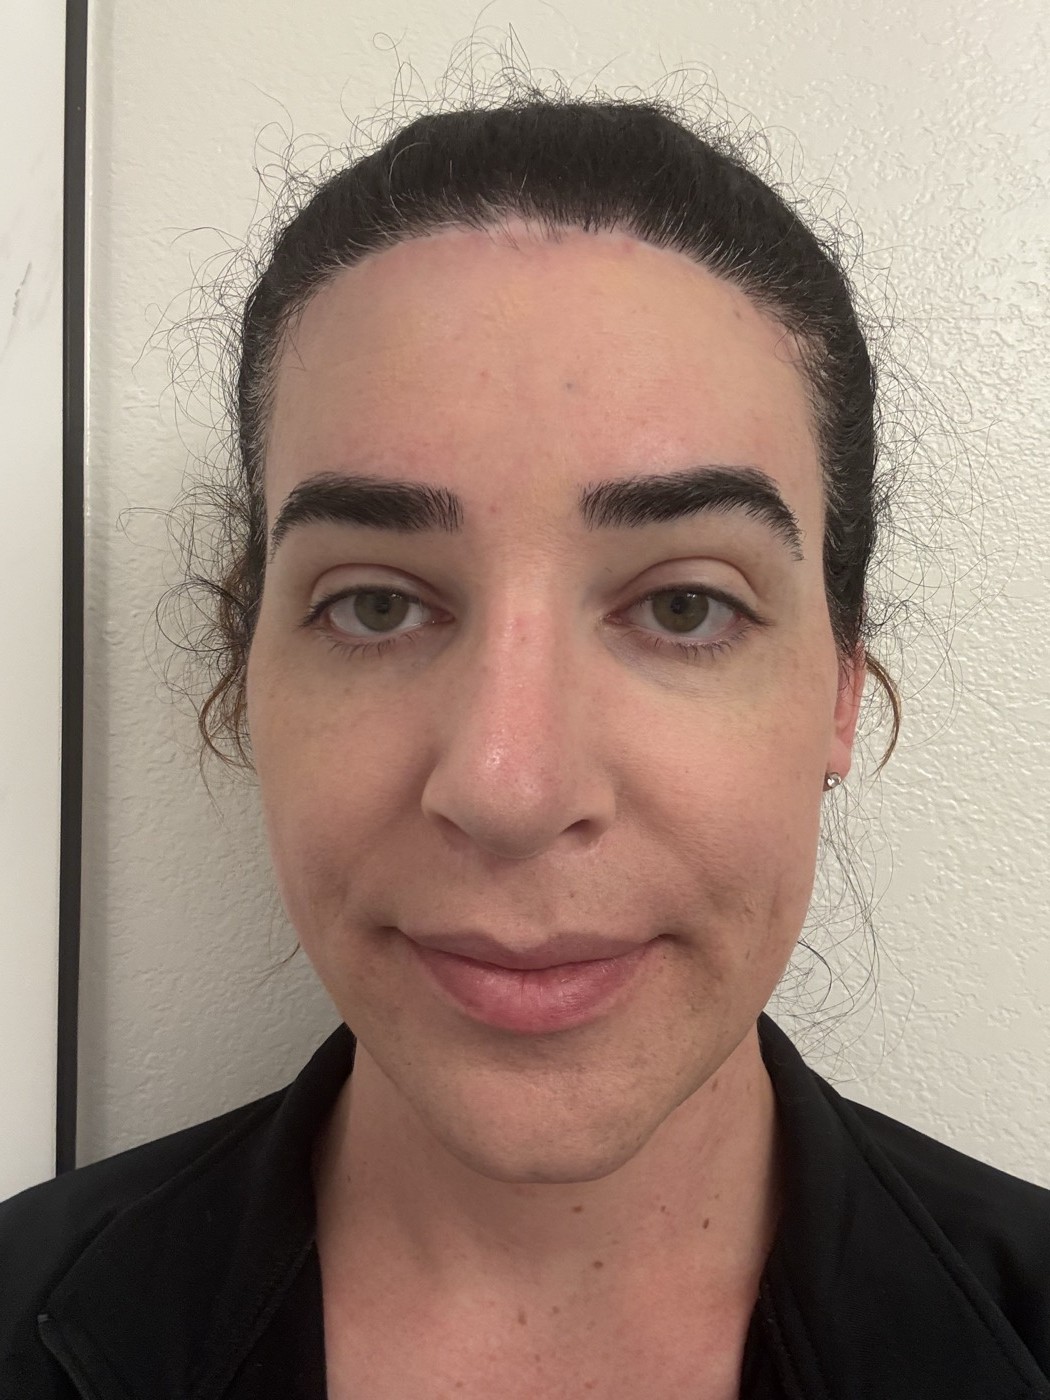
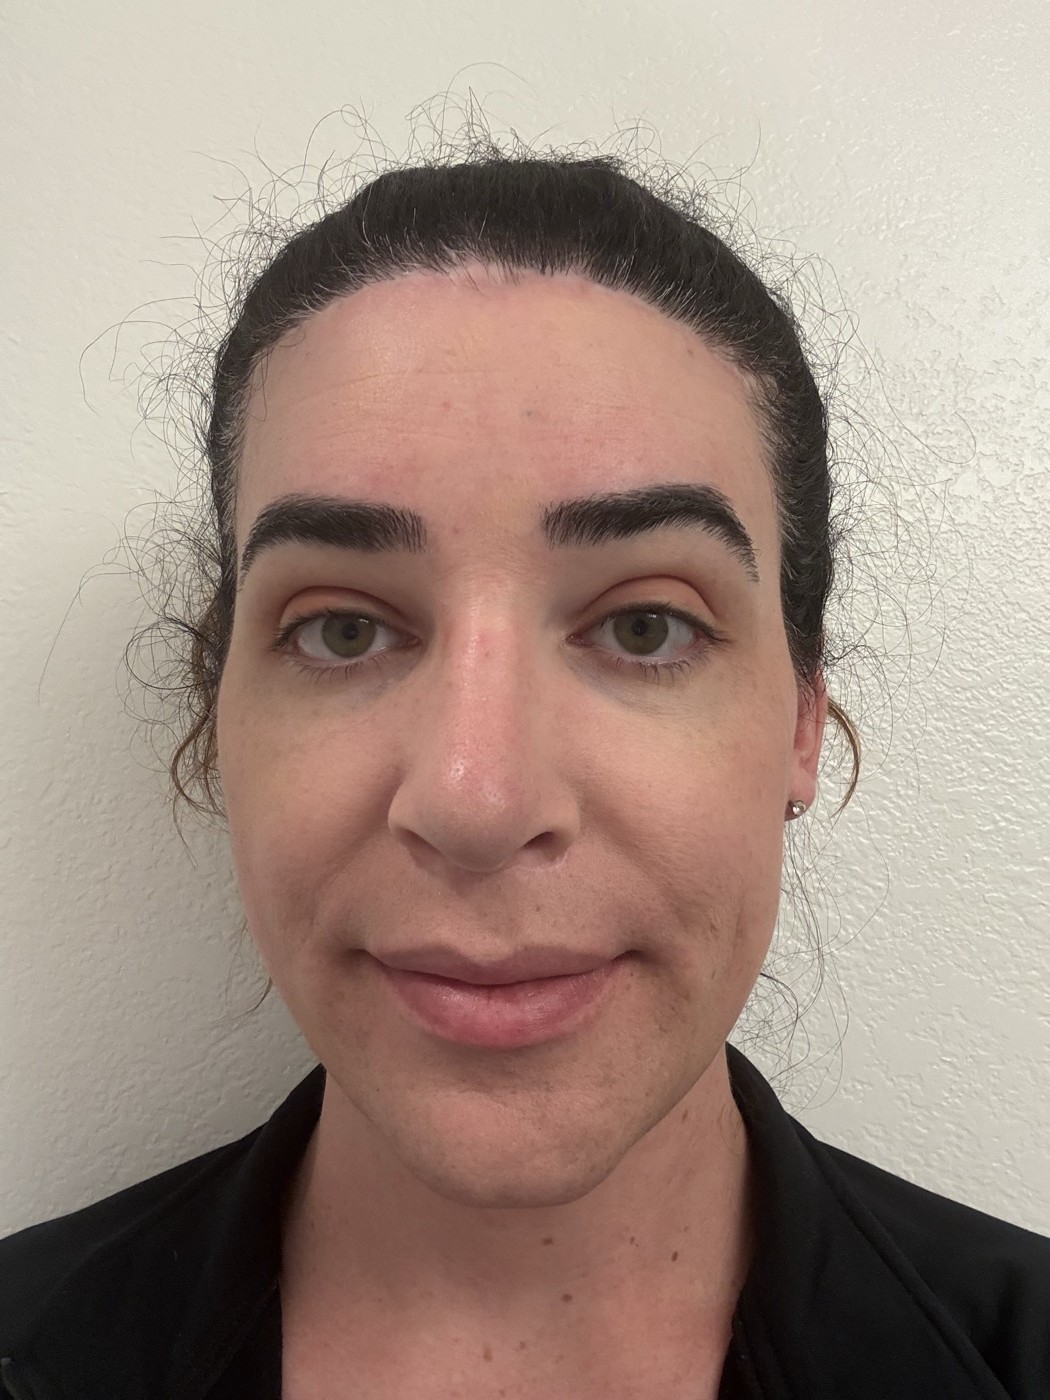
 After
After
 Before
Before/after comparison slider. Before: bare skin showing redness across the nose and cheeks after moisturizer, before any makeup. After: the same skin with a full makeup look applied and settled after five hours, covering redness with a natural finish.
Concepts to know upfront
Five concepts come up throughout the routine below — knowing what they mean will make the steps feel less arbitrary.
Symmetry. The overarching goal of the routine is symmetry — both halves of the face reading as a matched pair. Color correction (step 2) handles the asymmetric work where it applies (foundation then evens what’s left into a single tone), and from there, every change — bronzer, blush, eyeshadow, eyeliner — should be applied to both sides. A small imperfection applied symmetrically reads as intentional; the same imperfection on one side reads as a mistake. When I botch something obvious on one eye, I’ll wipe both eyes clean with a Neutrogena wipe and rebuild the whole region from scratch (not just the side that went wrong), so the fresh foundation blends symmetrically with the untouched makeup around it.
Settle (or “melt-in”). Heat from your skin causes the layers of makeup to settle and blend into each other over time. Makeup is designed with this in mind, so right after application it may not look quite right — you don’t need to actively wait for it though, the settle just happens naturally as you wear the makeup through the day. By the time anyone sees you up close, the layers have melted in and the foundation has mellowed into the look you were going for. Setting spray (step 8) helps here too: as well as locking everything in place, it traps a little heat against the skin, which gets the settling started. A note on terminology: you’ll often see this called “baking” loosely. Strictly, “baking” is a different technique — dusting setting powder over a cream layer and letting heat set it — that I don’t do today (see the techniques I’m considering at the end). I’ll use “settle” throughout to keep the two ideas distinct.
Blending. Wherever two areas of color meet, you don’t want a hard edge. After laying down eyeshadow I run a clean brush along the boundary between the lid and the brow bone so the transition is gradual rather than a stripe. I’ll also brush out any eyeshadow that strayed below the outer corner of my eye, smudging it into the foundation so the eyelid reads as broader and more open. The same idea applies to bronzer and blush boundaries: a soft transition reads as natural, a sharp line reads as makeup.
Fingers first, then brush. Moisturizer and sunscreen go on directly with clean fingers — they spread thin and even on bare skin that way, and that’s the finish I’m after for the base layers. From color correction onward, I load each liquid product (corrector, primer, foundation) onto the back of my hand first, pick it up with a brush, and dab it onto my face. The back of the hand acts as a loading dock: it lets me control how much product the brush carries before it touches my skin, which is what makes a thin, even coat possible. Other techniques are out there — pressing primer in with fingertips, sheer washes with a dampened sponge — but the back-of-hand-then-brush habit is what I’ve settled on for this routine.
Dab, never stroke. Whenever you’re applying makeup with a brush — laying it down, refining a coat, or blending an edge — use a dabbing or dotting motion rather than dragging the brush across the skin. Think painting by dotting. Strokes drag color around and disturb the layers underneath; dabs deposit color in place and let everything stay put. This is the single mechanical habit that took my finish from cakey to natural-looking. The rule applies to the main-face pass — foundation, bronzer, blush, concealer touch-ups — where wet layers are stacked on top of each other and strokes drag them around. Eyeshadow and pre-foundation color correction work differently: on the lid, a flat brush packs color in with short strokes, and at the corrector stage, strokes deliberately lift away excess color rather than drag it around. Both cases are explained in their step. Everywhere else on the face, dab.
Vocabulary
A handful of words turn up throughout the steps that aren’t obvious if you’re new to makeup. Short definitions:
- Primer
- A thin base layer applied before foundation that smooths the skin’s surface or shifts its finish — for example, adding a little glow. The one in step 3 is a luminosity primer; not all primers do the same thing.
- Luminous
- Softly glowing or lit-from-within, as opposed to flat or matte. A luminous finish catches light gently rather than looking dry.
- Cakey
- Makeup that looks heavy or sits visibly on top of the skin in a thick layer instead of melting into it. The opposite of natural-looking. Most of the techniques in this guide are aimed at avoiding this.
- Rose-toned
- A color with a pink or soft-red undertone, sitting between true pink and reddish-brown. The eyeshadow shades I default to in step 7 are in this family.
- Waterline
- The inner rim of the eyelid where it meets the eyeball — the wet edge just behind your lashes, top and bottom. I keep all eye products off the waterline (see step 7).
About your brushes
Last bit of upfront context, then on to the routine. The steps below refer to several brushes by job. You don’t need a wide collection — four categories cover everything I do, all of which come in any decent starter set:
- Foundation brush — larger and dense, fluffy or flat-topped, roughly two finger-widths across. Used for the foundation pass.
- Concealer / corrector brush — smaller and denser still, for laying down color correctors and any spot work. This is the “smaller brush” in step 2.
- Flat eyeshadow brush — small, dense, and flat for packing color onto the lid.
- Blending brush — small but fluffy and tapered (looser than the eyeshadow brush), for softening edges (eyeshadow boundaries, bronzer and blush edges). The “clean brush” in step 5 is one of these.
The shorthand for picking any brush, in this routine or beyond: dense for liquids and creams, looser for powders, and sized to the area you’re working on. Liquids need a packed bristle bundle that grips the product and dabs it onto skin without absorbing it; powders need an airier brush that picks up just a dusting and lets you build coverage. And the brush head should roughly match the area you’re applying to — a foundation brush for the whole face, a smaller corrector brush for a stripe down the nose, an eyeshadow brush sized for the lid, a blending brush sized for boundaries. Most of the time, if a step isn’t coming out right, the wrong-sized or wrong-density brush is the first thing to check before blaming the product. (I stick with brushes throughout — no beauty sponge in the routine.)
A basic set covers all four — see the More Makeup Supplies list in the Products section for the one I use, along with a brush cleanser. Brush hygiene: wash them weekly with a dedicated brush cleanser or a gentle shampoo. Dirty brushes carry skin oil and bacteria back onto your face, which matters for everyone but especially if your skin is sensitive or healing.
The morning routine
1. Skincare base
Before anything else, wash your hands. Most of this routine involves fingers and brushes touching your face repeatedly — loading product, dabbing on the back of your hand, blending edges, eventually cleaning up your lips with a fingernail in step 11. Starting clean keeps skin oil, residue from whatever you were just touching, and bacteria off the surfaces that go onto your face. It’s a 20-second habit that pays off across every later step.
I start with my daily lotion (Kiehl’s Ultra Facial Cream with Squalane), spreading it across the whole face including the eyelids, then ChapStick (it comes back at the end of the routine — see step 11), then sunscreen (Supergoop! Unseen Sunscreen SPF 50). The lotion goes on first so it has a moment to soak in before the sunscreen seals everything. This particular formula has worked for me on the eyelids; if you’re using a different moisturizer, especially with contact lenses or sensitive eyes, check the label before applying it to the eye area, since not every facial cream is formulated for that zone.
On sunscreen coverage. Sunscreen is the one product I keep out of the eye area — the lash line, the corners, and the eyelid skin itself. The trade-off is that the rest of the face needs careful coverage so a sunglass shadow doesn’t end up being the only protection in the gaps. I cover the nose, the bridge of the nose, the cheekbones, forehead, upper lip, and jawline — anywhere a pair of sunglasses won’t shield. Even with this formula, sunscreen migrates into my eyes once I’m doing anything active, so in practice I lean on UV-blocking sunglasses (look for “100% UV” on the label) and a hat to compensate while I keep looking for something formulated to be safe around the eyes that won’t migrate. If your eyes are particularly sensitive, an eye doctor or dermatologist is the right person to ask about eye-area sun protection. (For what I’m working toward on sunscreen, see techniques I’m considering.)
On absorption time: general advice is to give moisturizer and sunscreen a minute or two to absorb before laying anything on top — otherwise the next layer can slide. The way I structure my morning handles this naturally: I dry off after the shower, apply moisturizer, then come back for the rest a little later (often topping up moisturizer and adding sunscreen at that point). By the time I’m at color correction, the base layers are settled. The Supergoop! sunscreen also helps here — it goes on clear and doesn’t leave my skin feeling slippery, so even when I’m moving quickly the corrector still grips.
A note on mineral sunscreen. If you switch to a mineral (zinc oxide / titanium dioxide) sunscreen — for sensitivity, post-procedure recovery, or just preference — the white or gray cast those physical UV-blocking particles leave on the skin will change the canvas for everything that follows. The cast lightens the apparent tone of whatever is underneath, so redness reads less red and darker patches read less dark before you ever pick up a corrector. Expect to dial back both the green and orange in step 2, and to find that your usual foundation shade in step 4 may suddenly look too light — you may want a slightly warmer or darker shade to compensate. The whole routine still works; it just needs recalibrating against the new starting tone.
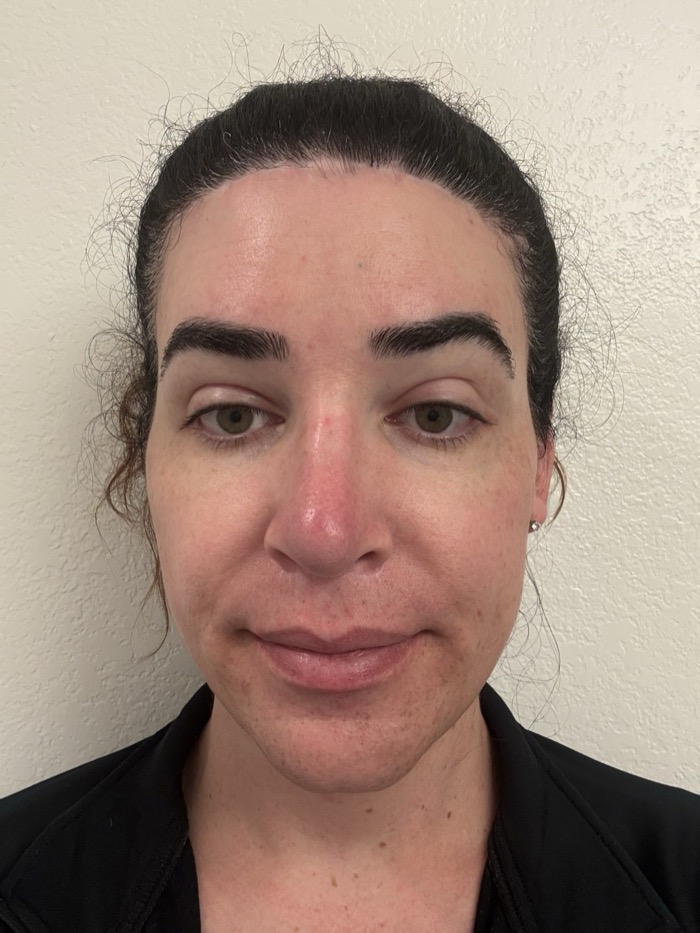
Step 1: Starting point — lotion in, nothing else yet. The redness across the nose, cheeks, and chin is what the next steps work on — and what the green corrector in step 2 specifically targets.
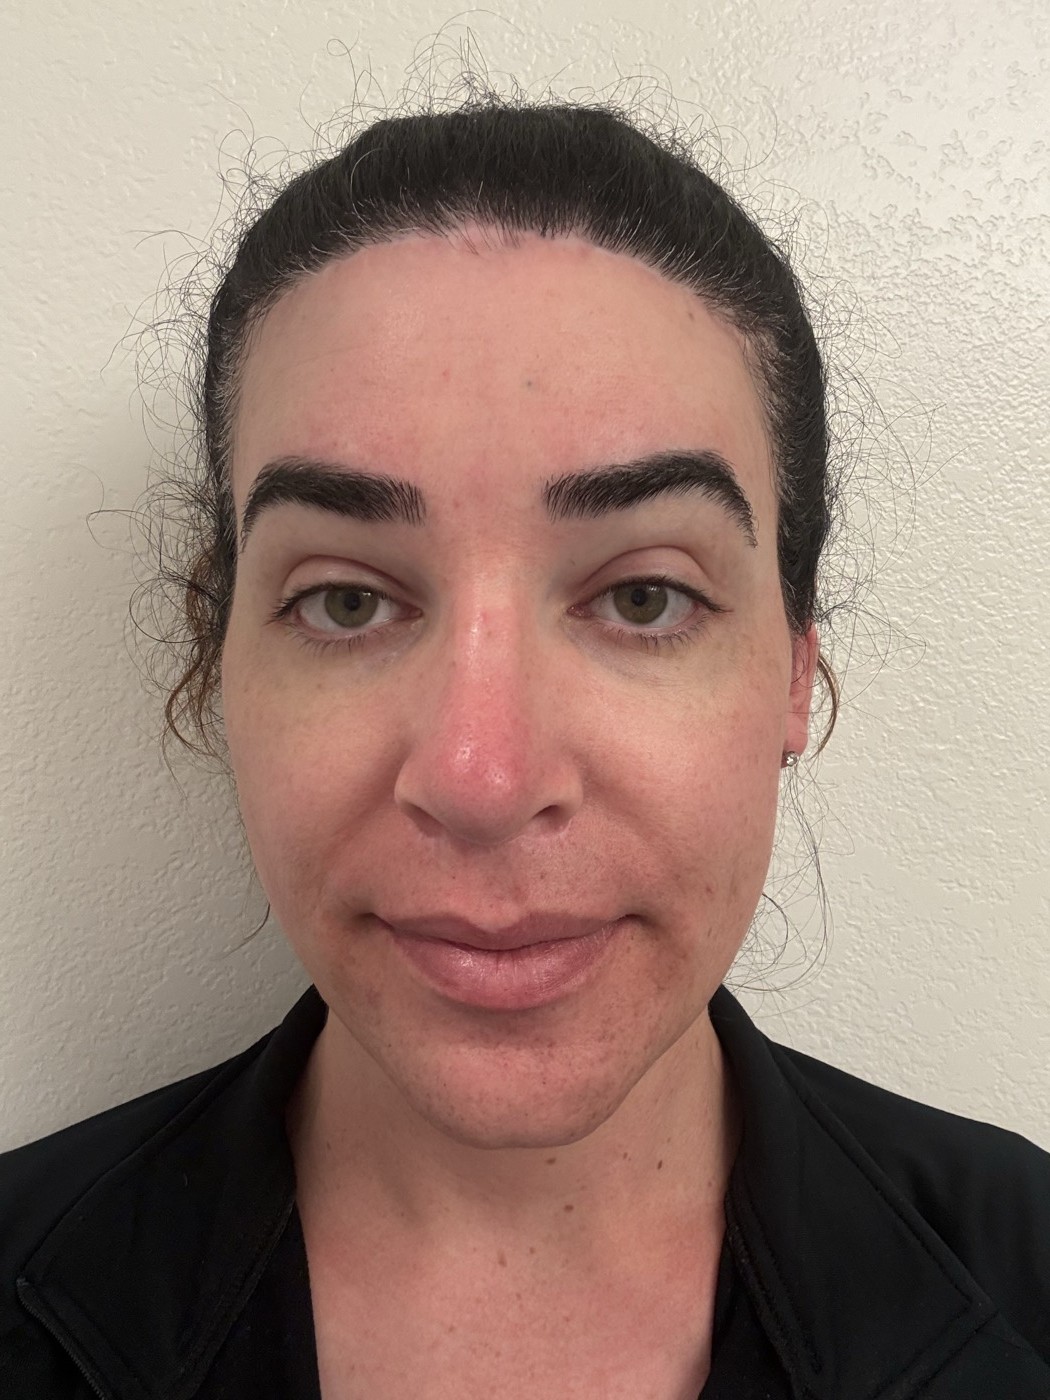
Step 1: After Supergoop! Unseen Sunscreen. The skin looks slightly more even and a touch luminous, but the underlying redness is still very much there — sunscreen isn’t trying to correct color, it’s protecting what’s underneath.
2. Color correctors
This is the part people ask about most. The idea is to neutralize tonal variation before you put foundation over the top. I work both sides of color correction every day — green to neutralize redness and orange to bring darker patches back in line — so the notes below come from steady practice with both, not just theory:
- Green on red areas. For me, that’s mostly my nose, which runs quite red on its own. I use Sephora Collection Best Skin Ever 8HR in 01 Green.
- Orange on areas that read darker than the surrounding skin — the kind of patch that would still show through foundation if you didn’t address it underneath. The everyday case for me is the bluish-gray shadow that dark facial-hair roots leave behind around the chin and upper lip; orange neutralizes that shadow so foundation has a single tone to land on instead of working against a hidden cool patch. The same shade also works on dark spots, post-procedure marks, or anywhere a small region just looks deeper than the skin around it. I use Huda Beauty #FauxFilter Under-Eye Color Corrector in Mango. The product is named for under-eye use, but I apply it on the lower face, not under my eyes — the shade is what matters; the marketing label doesn’t bind you to where you place it.
Other corrector colors exist that I haven’t personally used, but worth knowing they’re out there if green and orange aren’t matching what you’re trying to fix:
- Peach addresses cooler under-eye darkness on medium skin tones, where orange can run too warm.
- Red or brick does the same job for deeper skin tones, where orange isn’t warm enough to fully neutralize the shadow.
- Lavender counters sallow or yellow patches — the opposite of green’s job.
The principle is the same one driving green-on-red and orange-on-darker: pick the color opposite to whatever you’re trying to neutralize on the color wheel.
How I apply each:
- Green: the corrector I use has its own built-in applicator, so I lay it down directly on the spot first (e.g., a stripe down my nose), then switch to a dedicated brush and dab the tone out, blending the edges into the surrounding skin — the applicator alone won’t give a smooth coat.
- Orange: dab a small amount onto the back of my hand, then dab it where it’s needed with a smaller brush, softening the edges into the surrounding skin so the corrected patch doesn’t have a hard outline.
Watch for both motions in the video. With not much else on the face yet, the dabs deposit and blend the corrector while the strokes lift excess color off the brush and skin — together they land on a more natural finish at this stage. (As of step 4, dabs become the rule on the main face. See “dab, never stroke” in the concepts section above for why this stage is one of the carve-outs.)
Once you’re done, you’ll still see green or orange on your skin. That’s expected — the foundation that follows is what blends everything together. The cleaner the edge-blend now, the more seamless the foundation pass will look on top.
A note on aiming for natural: real faces aren’t a single uniform color — there’s always some variation, and it’s okay (and more believable) to leave a little of it in. The goal of color correction isn’t to erase every tonal difference; it’s to neutralize the ones that read as too much.
3. Foundation primer (optional)
If I want my skin to look a little more luminous, I work in some Charlotte Tilbury Wonderglow at this stage — after color correction, just before foundation.
On the order — primer after corrector, not before. Conventional advice is to prime before any colored product, so the corrector grips a primed surface. I do it the other way around on purpose, because the primer I use is a luminous one. Putting the luminous layer on top of the corrector lets it do the work I actually want it to: over-saturating the area with light so any subtle color variation (including whatever the corrector didn’t fully neutralize) gets washed out. If I primed first, the luminosity would land under the corrector and the corrected patches would read as a different shininess than the rest of the face — not what I’m after. The moisturizer and sunscreen from step 1 also act as a kind of pseudo-primer for the corrector, so the corrector still has a settled surface to land on. If you’re using a non-luminous primer (mattifying, blurring, pore-filling), the conventional primer-first order makes more sense — this carve-out is specific to luminous primers.
4. Foundation
Foundation does two jobs here: it covers the visible color correctors, and it pulls the corrected and uncorrected areas of your face into a single even tone.
On format: I use liquid foundation rather than powder. Liquid is much easier to settle and blend — the layers melt into each other smoothly through the day, where powder tends to sit on top and resist that mellowing.
On shade: with color correction underneath, foundation shade matters less than you’d think. I use Charlotte Tilbury Airbrush Flawless and keep two shades on hand (3 Neutral and 5 Cool) to switch depending on the look I’m going for. A perfect match mostly only matters if you’re going for full coverage.
How I apply it: dab a little foundation onto the back of my hand, load a larger foundation brush, and dab across my whole face including the eyelids (see “dab, never stroke” above — this is where it matters most). The first pass spreads it roughly even; a second pass with closer dabs refines the coat. The dabbing is what blends the corrected and uncorrected areas into a single tone.
I usually use about a quarter to half a pump, plus whatever I can squeeze from the nozzle onto the back of my hand. The amount should scale with the amount of color correction underneath — if I’ve laid down a heavier correction layer, I’ll bump up to a full pump so there’s enough foundation to even out everything below.
On concealer (or rather, the lack of one): a question that comes up — where’s the concealer step? My foundation does that job. With color correctors handling the strongest tonal variation underneath in step 2, what’s left for foundation to cover is mild and even, and Charlotte Tilbury Airbrush Flawless has enough coverage on its own to finish that work. A separate concealer would add a thicker layer on top of foundation in spot areas, which trends toward the cakey finish I’m trying to avoid. If you’re using a sheerer foundation than this one, or skipping color correction, you may genuinely need a concealer at this stage; for this routine specifically, foundation is doing both jobs.
When I’m done it almost doesn’t look like I’m wearing foundation. Obviously you can tell, but it doesn’t read as cakey, which is the goal. If it looks a little too present right after application, that’s fine — the layers will continue to settle as you wear it (no need to pause the routine to wait).
On viewing distance — a trade-off worth knowing: I think about it like this: how close does someone need to be before they notice the color correction? With heavier correction, you look amazing from about ten feet away — that’s the camera-friendly distance, and photos taken from there look great. As people (or lenses) get closer, the layers can’t blend cleanly enough to fully hide the correction underneath, and you’ll see more of it. There may be a more advanced technique that handles this better; I never learned it. For me, looking great from across a room and fine up close is the right balance.
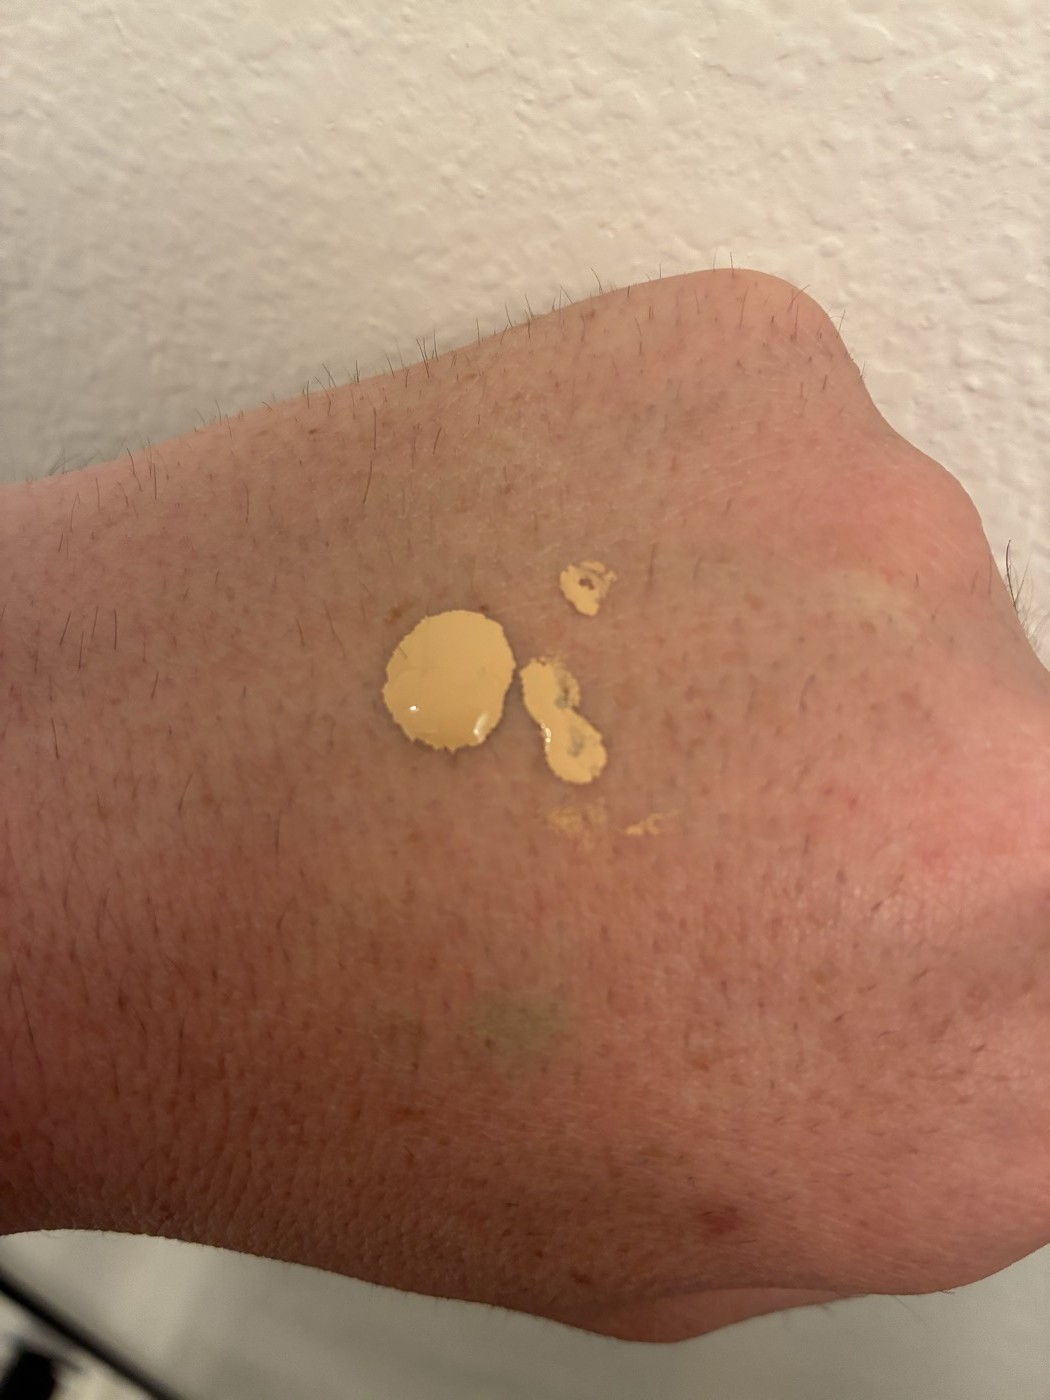
Step 4: This is roughly how much foundation I use for an entire face — about a quarter to half a pump, dispensed onto the back of the hand. The brush picks up from here in small loads. Less than you’d think, especially once color correction is doing the heavy lifting underneath.
Step 4: Foundation goes on by dabbing, never stroking. The first pass spreads it roughly even; the second pass with closer dabs refines the coat. Strokes drag color around and ruin the blend — dabs preserve it.
Step 4: After foundation, dabbed (never stroked) across the whole face. Compare to the post-sunscreen photo: the redness on the nose and chin has pulled into the surrounding tone, and the corrected and uncorrected areas now read as one continuous skin. This is what foundation is really for.
5. Bronzer
I use Makeup By Mario SoftSculpt in Light Medium and bronze three areas:
- Jaw — both sides under the jawbone (not the chin itself).
- Temples — just outside each temple.
- Nose — adds contour and depth so the face doesn’t look like a flat spotlight.
After laying down each area, I dab its edges into the surrounding foundation with a clean brush — the goal is depth, not visible stripes. If the placements above don’t click as written — especially the jawbone vs. chin distinction — the bronzer video in the sidebar walks through all three areas in motion, which is much easier to read than a description of where to put product on a face you can’t see.
6. Blush
Blush goes on the cheeks only — I want some redness on my face, just not on my nose (which I’ve already corrected and bronzed). Cheeks alone is the natural-looking balance. I use Fenty Beauty Cheeks Out Freestyle Cream Blush in 09 Cool Berry. Same blending principle as bronzer: soften the edges so the blush fades into the foundation rather than sitting as a defined patch.
7. Eyeshadow (and eyeliner, when going out)
Step 7 has two parts: eyeshadow most days, with eyeliner added when I’m not wearing glasses. They’re both eye-area work and they share a brush technique, but they’re separate operations — treat each on its own.
Eyeshadow
I use the Patrick Ta Major Dimensions III palette. Day to day I reach for one of the red-toned or rose-toned shades — a flattering choice if you’re trying to look like you’re not wearing heavy makeup. How it goes on: pack color onto the lid with short strokes of a flat eyeshadow brush, then with a fluffier blending brush, soften the lid/brow-bone boundary so the color fades out rather than ending in a stripe. Clean up any stray shadow below the outer corner of the eye (see the blending notes above). (See “dab, never stroke” above for why eyeshadow is a carve-out.)
Why eyeshadow only most days: I wear glasses regularly, and the frames already do most of the work of framing the eyes — so eyeshadow alone is usually enough underneath. I keep several different pairs in rotation and switch between them to add a bit of style and pair with outfits, which is its own kind of self-expression.
Eyeliner (going-out only)
On going-out days I’ll often add eyeliner at this stage, and sometimes a sparkly shade from the same palette. Mascara comes later — see step 9. (For me specifically, going-out days are also non-glasses days — I’m fortunate to not need them to see — so the whole eye region has extra room to do the talking. If you wear glasses every day, you can absolutely still wear eyeliner here; it’ll just compete with the frames in a way I don’t typically deal with.)
How I apply it: before I touch my face, I check the tip on the back of my hand — one test stroke should pull a thin, crisp line. If it looks clumpy, the tip has too much product — wipe it on a tissue and test again. If it breaks up or skips, the felt is dry (often because the cap was off too long, or the pen is getting old) — prime the tip by drawing a few small lines on the tissue, then re-test. Application starts at the inner corner of the eye (the end closest to your nose) and works outward in short, light strokes, all of them just above the top lash line. I always go inside to outside — other tutorials teach outside-in or both-ends-meeting-in-the-middle, but inside-out is what works for me. Going outside-in tends to deposit too much in one spot and is harder to course-correct from. The goal is a smooth arch from inner to outer corner.
If a stroke lands a little off, I usually fold the deviation into the arch rather than restart. If the mistake is too large for that, I’ll wipe both eyes clean with a Neutrogena wipe and start over from a consistent base, so the new lines come out matching (see the symmetry concept above). I keep liner above the top lash line only — no waterline, no lower lash.
Wings: I’m not great at them. I’ll occasionally try one with limited success; mostly I leave them off.
8. Setting spray
A quick mist of Charlotte Tilbury Airbrush Flawless Setting Spray locks everything in and traps a little heat against your face, which helps kick off the settle. Let it dry fully before doing anything else.
Step 5: Bronzer along the jaw, temples, and nose. Each placement gets blended out at the edges immediately afterward — depth, not stripes.
Step 6: Blush on the cheeks only — not the nose (already corrected and bronzed). Same blending principle: soft edges, no defined patch.

Steps 5–6: Mid-routine, after bronzer and blush. You can start to see depth coming back into the face — the foundation pass evens everything out, and bronzer/blush put the variation back in deliberately, in places that flatter rather than distract.
Step 7: A rose-toned shadow from the Patrick Ta palette, laid down across the lid. Soft and warm rather than dramatic — flattering enough to read as “not wearing heavy makeup.”
Step 7: Blending the lid/brow-bone boundary and brushing any stray shadow below the outer eye into the foundation. Smudging it down opens up the eye area and keeps the shadow from sitting as a stripe.
Step 8: Everything applied, just before setting spray. Eyeshadow is in, blending is done, the face reads as finished. The setting spray that follows locks it in and helps kick off the settle.
Step 8: A quick mist of setting spray locks everything in and traps a little heat against the skin, which kicks off the settle. Let it dry fully before doing anything else.
9. Mascara (if going out)
On the days I’m wearing mascara, it goes on after the setting spray has fully dried — never before. If I apply mascara first and then mist setting spray over it, the spray reactivates the mascara and it bleeds down onto the skin under my eyes, leaving smudges I then have to clean up and rebuild around. Putting it on after the spray avoids the problem entirely. Eyeliner and eyeshadow are fine to set under the spray; mascara is the one eye product that has to wait.
Eye-product hygiene: a couple of habits that really do matter here. Replace mascara about every three months — the wand is wet, dark, and repeatedly going back into the tube, which is exactly the conditions bacteria need; an old tube is how eye infections start. The same logic applies to liquid eyeliner, just on a longer timeline. And don’t share eye products — mascara, eyeliner, eye-area applicators — with anyone, even close friends. Conjunctivitis and styes pass between people through shared mascara wands, no matter how clean everyone’s technique is.
10. False lashes (occasional)
For going-out looks I’ll occasionally add false lashes — Lilly Lashes Rule Breaker, the self-adhesive kind. This is the most advanced part of the routine, and not worth attempting until you’ve practiced eyeliner and mascara on their own — both come into play here. Eyeliner hides and blends the adhesive strip along the lash line; mascara ties the false lashes into your natural ones so the two layers read as a single set rather than stacked on top of each other. If you can’t yet get liner and mascara clean without lashes, lashes will only amplify whatever isn’t working underneath.
On adhesive: first wear, the factory tack on these self-adhesive lashes is usually enough on its own. From the second or third wear onward — once the factory tack has weakened from being peeled off and put back in the case — I add a thin layer of eyelash glue (I use L.A. Colors Dramatilash) on top of the built-in strip. That extra glue is the difference between lashes staying put through the evening and a corner peeling up halfway through dinner.
On applying them: with eyelash glue, less is more. Squeeze a tiny amount onto a fingertip or the tip of the glue applicator and run a thin coat along the strip — less than a drop per lash. Anything heavier reads as a visible bead at the lash line and undoes the work the eyeliner is there to do. Wait about 30 seconds after coating the strip before placing the lash — that’s how long it takes the glue to go from wet to tacky, which is the consistency that actually grips the lid. Placing it wet is the single most common reason a strip slides around or peels at the corners. Use your opposite hand to gently steer the lash into place on the upper eyelid. I anchor at the outside corner first — the end furthest from your nose — then settle the rest of the strip inward toward the inner eye. (Many tutorials teach the opposite: place the centre of the strip first, then press both ends down. Centre-first is the more common technique; outside-first is just what works for me with this particular lash shape.) Best practice is to trim the strip and apply only the outer half or two-thirds of it, where most of the visual work happens; I haven’t yet perfected a clean trim, and I’m fortunate my eye shape can carry the full strip without it reading as off — so for now I use the whole thing. Once the lashes are set, a line of eyeliner along the strip and a final pass of mascara blend them into the rest of the eye.
On removing them: the Tatcha cleansing oil from the night cleanse (see below) lifts the adhesive cleanly. I work it in around the lashes, then let the shower do the rest — the lashes separate from the eyelid intact, no rubbing or pulling, which protects both the lashes (so I can wear them again) and the delicate skin around the eye.
11. Lip cleanup + ChapStick reapply
Once the setting spray has dried and I look at the finished face, I’ll run a fingernail across my lips to gently lift off whatever foundation landed there and expose my natural lip color, then reapply ChapStick. (This is one of the reasons washing your hands at the start of step 1 matters — the fingernail goes on the lips at the very end.) Sometimes I wear lipstick — Charlotte Tilbury Matte Revolution in Mrs. Kisses — but typically not in the morning, when I’d rather keep things simple. (Mrs. Kisses is a matte formula, which can cling to dry patches; lip prep here is handled implicitly — the ChapStick from step 1 has been on the lips the whole time the rest of the face came together, so by the time lipstick goes on, lips are already conditioned.)
Why a fingernail and not a cotton swab. A damp cotton swab is the obvious-looking alternative, but I don’t use one here: at this point in the routine the face is freshly tacky from setting spray, and anything cotton (swab, ball, pad) tends to leave fibre residue on the surface that’s very hard to spot until you’re out in daylight. A clean fingernail leaves nothing behind.

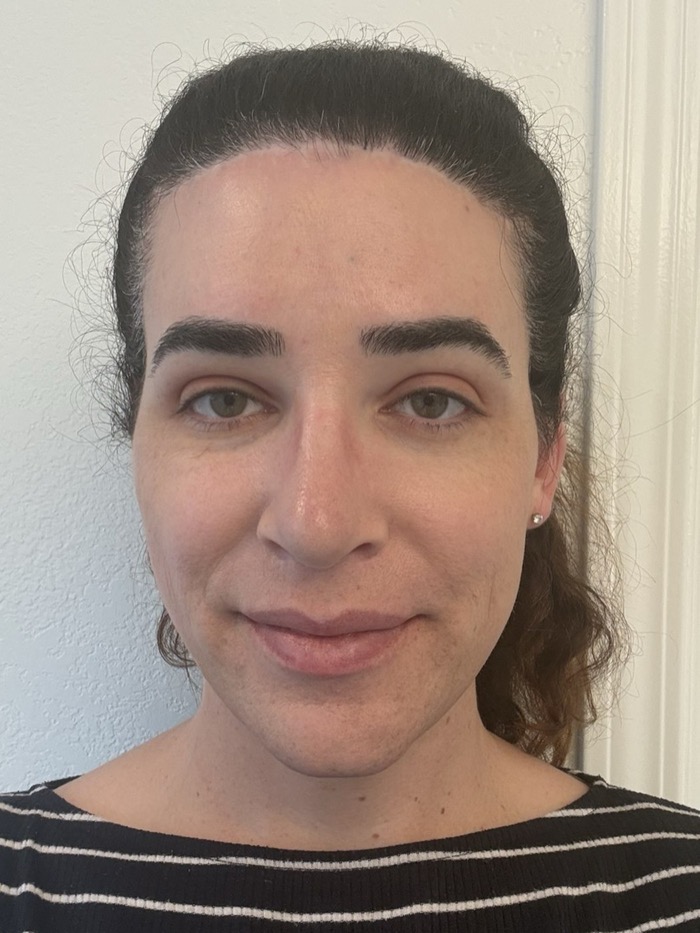
After step 11: Done. From here it’s just letting the layers settle as I go about my day. Total time from the first photo to this one: about seven minutes, including stopping to take photos and videos along the way.
Five hours later, in daytime light. The settle has done its work — everything has melted into the skin rather than sitting on top, and the nose redness from the very first photo is gone, not just covered. This is what the routine actually looks like out in the world.
The rest of the routine
Night cleanse
Before bed, in this order:
- Cleansing oil. Two or three pumps of Tatcha’s Camellia Oil 2-in-1 into my hand, rubbed onto my face, then rinsed off with water and patted dry with a towel. The towel often catches a little leftover makeup the rinse didn’t lift, which is fine.
- Rice wash (weekly). About once a week, I add Tatcha’s Rice Wash on top of the cleansing oil step.
- Hydrating overnight mask. Kiehl’s Ultra Facial Overnight Hydrating Mask, applied just before bed; I sleep in it.
On heavy eyeliner days: the cleansing oil alone won’t lift waterproof eyeliner (I use Sephora Collection Intense Felt-Tip 12HR Waterproof) — I’ll reach for a Neutrogena makeup-remover wipe before starting the cleanse. I avoid the wipes otherwise because they’re harsher than the oil.
Brow + nose waxing
Outside of the daily routine, I get my eyebrows and the inside of my nose waxed on a steady cadence. Both make a real difference once foundation goes on and you’re looking at your face up close, and a steady cadence is much easier to maintain than catching up after letting them grow out.
On brow product (or rather, the lack of one): the morning routine has no brow gel, pencil, or pomade step. With this waxing cadence, my brows are already shaped how I want them and don’t need filling in or holding down. If your brows are sparser, lighter, or differently shaped from how you want them to read, a brow product belongs somewhere between step 6 and step 7 — just keep the same blending principle as everything else (soft transitions, no hard lines).
A skincare trade-off worth flagging: because I wax, I deliberately don’t use retinol (or other retinoids like tretinoin / Retin-A), even though it’s one of the most effective anti-aging ingredients for adults. Retinol thins the skin and makes it more fragile, so waxing on retinol skin can pull patches of it off — most aestheticians ask you to stop retinol for at least a week before a wax. I’d rather keep the regular waxing cadence (I enjoy it), so retinol is off the table for me. As with most things in beauty, this is a trade-off — folks who want retinol’s benefits often go with threading instead, which I believe is the safer pairing. Retinoids are also commonly set aside during pregnancy and breastfeeding; if that applies to you, it’s a question for your own care team rather than a beauty page.
Learning and resources
How I learned
The bulk of what I do came from a Sephora makeup consultation — they walked me through a routine and recommended many of the products linked above. From there I filled in gaps with online tutorials (mostly YouTube), and a lot of mirror practice with what I’d picked up.
One more thing that shaped this routine: I get regular facial electrolysis, which leaves my skin red right after a session and dark in patches as hairs cycle back in. Working both kinds of variation on the same face, week after week, is how I got comfortable with the green-and-orange approach in step 2 — and why I trust it for anyone correcting either.
For my more showy looks — vibrant eyeshadow, the deliberately cakey performer finish, false lashes, sharper eyeliner — I credit my figure skating team. Performing alongside the other girls and having them help me through the makeup side of competition taught me techniques I wish I’d learned as a child.
On iterating on the routine: when I experiment with a structural change — a new product slotted in, a step reordered, a different brush technique — I budget about 20 minutes to plan it, perform it, and evaluate the result. Most changes don’t survive that single trial. The ones that do tend to earn their place on the second or third wear, when I’ve had time to see how they settle and how they hold up through the day. Naming the change up front (“today I’m trying X”) makes it easier to compare against what I usually do and to know whether to keep it.
Techniques I’m considering
These are the techniques currently in my 20-minute trial budget. The routine above isn’t fixed — there are things I haven’t folded in yet but am thinking about. Calling them out here makes the routine’s edges visible: what it currently does, what it doesn’t, and what an addition would actually change. If a technique below ends up in regular use, it’ll move out of this section and into the steps proper.
Under-eye color correction
The orange corrector in step 2 currently only goes on the lower face — chin and upper lip — to neutralize the bluish-gray shadow from dark facial-hair roots. Adding it under the eyes would address something the routine doesn’t currently touch: the natural shadow that sits in the under-eye hollow and shows through foundation as a tired or sleepless look, regardless of how slept I actually am.
How it would reshape the routine: the application step itself is small — a thin layer of orange under each eye, then dabbed in with the smaller corrector brush before foundation. The downstream change is what matters. Cream products under the eye fold into the natural creases there over a few hours unless something locks them in place, and the result is a visible line of corrector + foundation gathered in the crease. To make under-eye work hold up through the day I’d need to add a setting powder step. From what I’ve read, that means a setting powder dusted lightly over the corrected and foundationed under-eye area with a small flat puff or fluffy eye-blender brush (not a face powder brush, which is too big for the area). That’s a new tool and a new product. One inclusivity note on powder choice: from what I’ve read, translucent powder is the obvious default but it can flash white in flash photography, especially on deeper skin tones, and a tinted setting powder matched to skin tone is the more universal choice. I haven’t done baking or setting powder myself, so I’d need to pick one of those rather than reaching for whatever’s on the shelf.
Lash curler
Curling lashes before mascara opens up the eye in a way mascara alone can’t quite match — especially on going-out days when I’m not wearing glasses to do that framing work for me. Eyelashes have a natural slight curl in most people, but it varies, and mascara on uncurled lashes mostly adds length and darkness without adding the lift.
How it would reshape the routine: minimal. The curler slots in right before step 9 (mascara), after setting spray has fully dried. From the tutorials I’ve watched, the technique I’d want to learn first is a rounded curl: from what I’ve read, that’s 2 or 3 squeezes along the lash, working from the base outward (root, middle, tip) for 1–2 seconds at each position, rather than a single hard crimp at the base. Another pro tip I’ve picked up from those tutorials is to warm the curler first — a few seconds with a hairdryer on low, until it’s warm to the touch but not hot — the reasoning being that warm metal sets a curl faster and more durably. Then mascara goes on top to lock the curl in place. About 30 seconds added on going-out days, nothing on glasses days. The curler itself is a one-time drugstore purchase (around $10), so no ongoing cost. The rule I’ve read everywhere, and the one I’d follow when I do start: never curl after mascara — wet mascara on the lash will glue itself to the curler pad and pull lashes out as you release.
Eye primer (before lid foundation + eyeshadow)
Step 4 currently puts foundation directly on bare eyelids to even out the lid’s tone before eyeshadow. Without an eye primer underneath, those layers can crease or fade through the day as the eyelid moves and brushes against the brow bone repeatedly. As I understand it, an eye primer is a thin, tacky base specifically formulated to grip both foundation and eyeshadow on the lid surface.
How it would reshape the routine: small but persistent. A single dab of eye primer on each lid right after step 1 (or after step 3 if I’m using the foundation primer that day), worked in with a fingertip. From there foundation and eyeshadow would land on a primed surface and stay put longer through the day. Adds about 15 seconds in the morning, plus one new product (a Sephora-tier eye primer runs around $25). The trade-off worth thinking about: longer-lasting eye makeup costs me one extra step every day, even on days when I’m not going anywhere that requires it to last.
Wider sunscreen coverage
The avoid zone for sunscreen is narrower than I’d assumed — direct contact with the eye is the actual concern, which is really just the lash line and the inner corner. The eyelid skin above and below the lashes still gets direct UV that sunglasses don’t fully cover, and the same goes for the ears and hairline behind a hat. Closing those gaps would put sun protection on every surface that’s exposed on a normal day, not just the obvious ones.
How it would reshape the routine: two extra beats in step 1. A careful sunscreen pass right up to the lash line (skipping only the lash margin and the inner corner), then a quick swipe across the ears and along the hairline. About 30 seconds added in the morning, no new products beyond a formula that’s safe to use on the eyelid — which is the thing I’m waiting on. Until I find one that doesn’t migrate into my eye when I’m active, putting sunscreen closer to the lash line just makes the migration problem worse, so wider coverage stays on hold until the formula hunt in step 1 turns something up.
If you’re just starting out
The full routine and product collection can feel like a lot if you’ve never put on makeup. Sample and travel sizes are great for figuring out what works before committing to full bottles. Here’s the minimum I’d reach for first:
- Daily lotion — sample or travel size.
- ChapStick — cheap and easy at any drugstore.
- Sunscreen — sample or travel size; non-negotiable for daily wear.
- One color corrector — whichever you need: green if your face runs red, orange for darker patches; see step 2 for peach, red/brick, and lavender alternatives if those don’t match what you’re trying to fix.
- Foundation — sample or travel size.
- Blush — can double as eyeshadow with a different brush, so pick a tone you’d be happy wearing on either.
- Setting spray — travel size.
- Brushes — one foundation brush, one smaller corrector brush, and two eyeshadow brushes (one flat for packing color, one fluffy for blending).
That’s enough to follow the routine above. Once you know what you like, you can move up to full sizes and add bronzer, additional eyeshadow shades, and the night-cleanse products.
On cost: the products linked throughout this page are mostly premium-tier — Sephora, Charlotte Tilbury, Patrick Ta — so the dollars add up. Rough numbers: a starter kit built from sample and travel sizes lands in the $60–$100 range; a full kit at full sizes runs around $400–$500 for the morning routine alone, plus another $100–$150 for the night-cleanse products. Sample and travel sizes are how I’d suggest starting: see what your skin actually likes, and only commit to full bottles for the products you settle into. Drugstore equivalents work fine for the everyday-essential layer — daily lotion, sunscreen, ChapStick, and makeup-remover wipes (the Neutrogena ones I link in the night-cleanse section are the cheapest item on this page) — and you don’t lose much by saving there. Where the premium products earn their keep is in foundation and color correctors, where shade range and finish are noticeably better than what I’ve found at the drugstore.
One practical tip: Sephora runs two major sales a year — wait until one of those to stock up on the products you’ve settled into. And as your technique improves, you’ll likely find you use less and less product, so a single full-size bottle tends to last a long time.
Most of these products are also on display in the Sephora store, where you can try them as samples to test shades and textures before committing. If you’re a friend of mine and want to go browse together, I’d love to come along. And if you have follow-up questions while you’re trying any of this — what to swap for your skin, whether something I describe matches what you’re seeing in the mirror, anything — the best way to reach me is on Instagram (link in the footer below; my account is private, so request a follow first if we’re not already connected). DMs there are how I’d rather do the back-and-forth than try to anticipate every variation in writing.
Products
My full product collection lives across these lists, organized by purpose:
- Daily (Sephora) — the everyday morning routine: lotion, sunscreen, primer, correctors, foundation, bronzer, blush, setting spray, eyeshadow.
- Nightly (Sephora) — the cleansing oil and the overnight hydrating mask.
- Cleanse (Sephora) — the weekly rice wash.
- Loves (Sephora) — favorites and extras: Charlotte Tilbury Matte Revolution in Mrs. Kisses, mascara, eyeliner, and an alternate foundation shade.
- More Makeup Supplies (Amazon) — the Neutrogena wipes, makeup-brush set, brush cleanser, and other workhorses.
- Lilly Lashes Rule Breaker (Costco, self-adhesive) — not part of the daily routine, but the lashes I keep around for when I want them.
- L.A. Colors Dramatilash Lash Adhesive (CVS, clear) — the extra glue I add on top of self-adhesive lash strips for staying power.